STE Rate Timetable
Timetable defines the shift patterns that will be applied and specify the hours (eg Week days, week nights, weekend, bank holidays)
If you wish to copy any existing timetable settings, you can go to any Timetable and click on the Import/Export button in the submenu then click the Export button (a file will be downloaded). Once you have the Timetable exported go to create a new Timetable and within this new timetable use the same Import/Export button and import the file you just exported. Once imported just save the Timetable.
This button is only available to administrators and supervisors.
Note: If you use the import feature in an existing timetable it will be overwritten by the data within the import file.
If the timetable is in use, make sure you are careful when making any timetable edits, as any change to the timetable settings will be applied to all organisations that are connected to this timetable (via the STE Rate Group).
Timetable changes are not applied retrospectively to the timesheets – If you want to apply changes to specific timesheets, just use the Recalculate function within the timesheets.

Bank holidays
There are different approaches that can be applied when setting Bank holiday rates and periods.
A) Bank holiday fixed price
You can apply this type when your pay and charge rates are a fixed amount for the whole Bank holiday day.
Just Add a new section, pick “Bank holiday fixed price”. On the Rate groups page, this will be displayed for you to be filled in.
B) Bank holiday multiplier
This applies when your pay and charge rates are based on the multiplier of the rate that you would standardly pay.
Just Add a new section, pick “Bank holiday – multiplier”. You will then enter the multiplier eg 1.5.
On the Rate groups page, this section will not be displayed.
C) Bank holiday hour specific rates
1) Bank Holiday Day / Night (differing rates)
If you want to set a different rate for Bank Holiday Day and Night,
* Add the Bank Holiday Day, and set the Section type to “Bank Holidays – hours”, click to Add new day, pick the “Holiday day” and set the Time from 08:00 and Time to 20:00.
* Then Add new section, call it “Bank Holiday Night”, pick the Section type “Bank Holidays – hours”, click to Add new day, pick the “Holiday day” and set Time from 00:00 and Time to 08:00.
* Click again to Add new day, pick the “Holiday day” and set Time from 20:00 and Time to 24:00.
You can set specific hour breakpoints if required (eg. replace 20:00 with 18:00)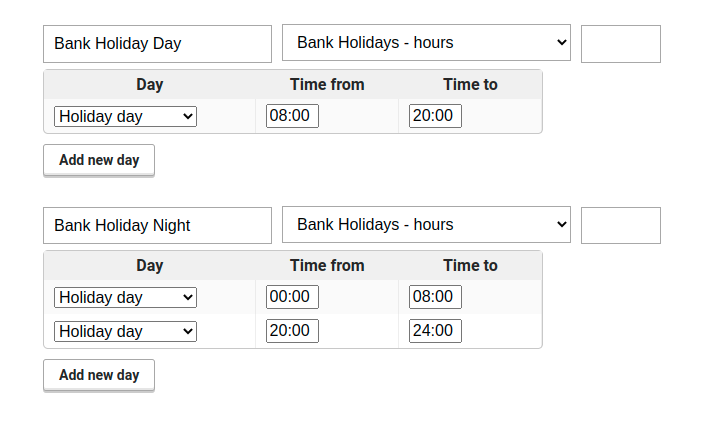
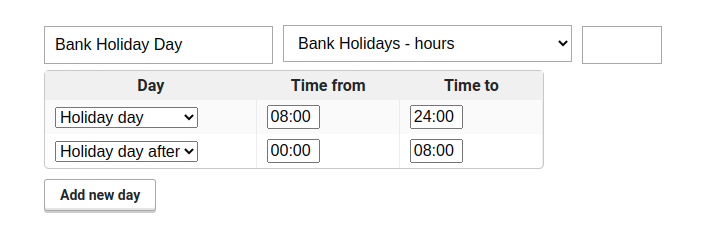
2) Bank Holiday starting at 08:00 and finishing at 08:00 next day (with same rate)
Often used in the Republic of Ireland.
* Add the Bank Holiday Day, set the Section type to “Bank Holidays – hours”, click to Add new day, pick the “Holiday day” and set Time from 08:00 and Time to 24:00.
* Then again click Add new day, pick the “Holiday day after” and set Time from 00:00 and Time to 08:00.
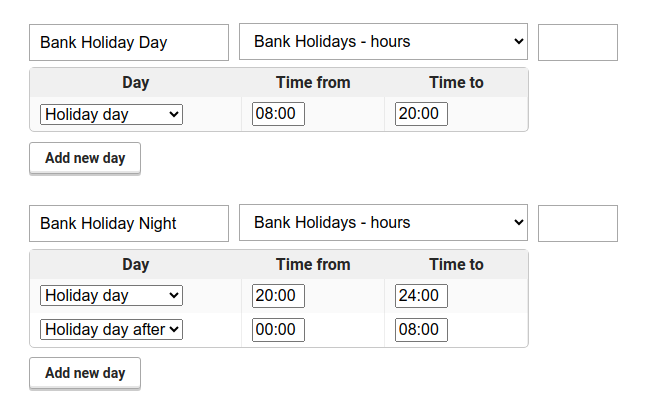
3) Bank Holiday starting at 08:00 and finishing at 08:00 next day (with a different day and night rate)
If you want to set the Bank Holiday with a different day and night rate to calculate from 08:00 and finishing at 08:00 next day then go to the STE Rates within Temp Manager. Carry out the following steps:
* Add the Bank Holiday Day, set the Section type to “Bank Holidays – hours”, click to Add new day, pick the “Holiday day” and set Time from 08:00 and Time to 20:00.
* Then add the new section, call it “Bank Holiday Night”, pick the Section type “Bank Holidays – hours”, click to Add new day, pick the “Holiday day” and set Time from 20:00 and Time to 24:00.
* Click again to Add new day, pick the “Holiday day after” and set Time from 00:00 and Time to 08:00.
We are happy to assist you when setting these up if you are unsure how to proceed.
Special bank holidays
You can specify special bank holidays and assign different rates to them accordingly (For example, these could be used for shifts that are difficult to fill, such as Christmas or other holiday period shifts). These are working within the same ranges as Bank holidays.
Defining which public holidays apply and how Specific Public holiday fixed rates will be defined for each STE Rate group.
Rate Time extensions
Time extensions allow you to set the number of minutes that the shift rate can be extended by into either the following, or the previous shift rate if the second rate is shorter than the minutes set.
To set the time extensions tick the Show time extensions checkbox under the Timetable name input. Two new columns will be shown in the Sections tables one for Time from extension and another for Time to extension.
To better illustrate how time extensions work, let’s use a few examples.
Suppose we have the following sections in our Rate Timetable:
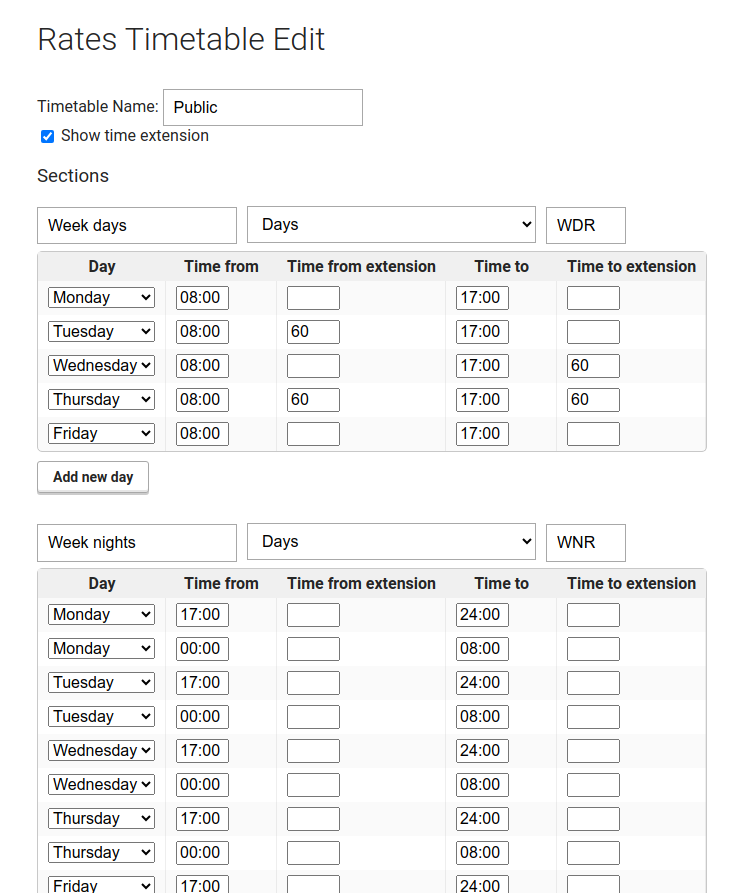
Let’s review these images in the following examples on Shifts from Monday to Thursday that start at 07:15 and end at 17:30.
Monday rate has both “Time from extension” and “Time to extension” empty therefore YouRecruit will not extend any of the rates and will charge them separately. So the charges will be 07:15 – 08:00 (45 mins) for “Week nights”, 08:00 – 17:00 (540 mins) as “Week days” and finally 17:00 – 17:30 (30 mins) again as “Week nights”. Because we have two charges for the same Rate they will be merged so the final charges will be 540 mins for “Week days” and 75 mins for “Week nights”.
Tuesday has “Time from extension” set to 60 mins. This will change the charges to be 585 mins for “Week days” and 30 mins for “Week nights” because our “Time from extension” allows to merge the preceding charge if it’s equal or less than 60 mins. If the shift started at 06:59, it would not be merged as it is longer than our allowed extended mins.
Wednesday Shift will have 570 mins for “Week days” and 45 mins for “Week nights”. Meaning the 30 mins that are after 17:00 are charged as “Week days”. Similarly if the shift ended at 18:01, it would not be merged as it exceeds the 60 mins extension.
Thursday will have only one charge for 615 mins for “Week days” even though the combined minutes for the “Week nights” charge exceeds 60 mins, they are actually two charges, One for 45 mins before 08:00 and one for 30 mins after 17:30. Because we have set both Time Extensions for Thursday, both will be merged as a “Week days” charge.
Alternatively, If the shift was from 06:30 to 17:30 only the 30 mins after 17:00 will be merged, with 90 mins remaining for the “Week nights” charge.