Employee Profile
The Employee profile page is the central point of all information about the employee.
Create a New Employee
When logged into Temp Manager. Click on Employees in the main dashboard. This will bring you to the Active Employees page where you will see a list of all of the current employees.
On the top right you will see a blue button Add an Employee. Clicking on this link will bring you to the Create new Employee page. Here you can insert the selfie profile picture provided by the employee during their onboarding process.

Personal Details
You will then be able to complete the fields for personal and contact details, title, name, email, contact number etc.
Address Details
Below the contact details you will be able to insert the new employee address details. It is important to complete these fields in entirety as when future shifts will be offered it can be ascertained how far the person will need to travel or is willing to travel within the radius of a work location. Also within this section you can locate their address on a map.
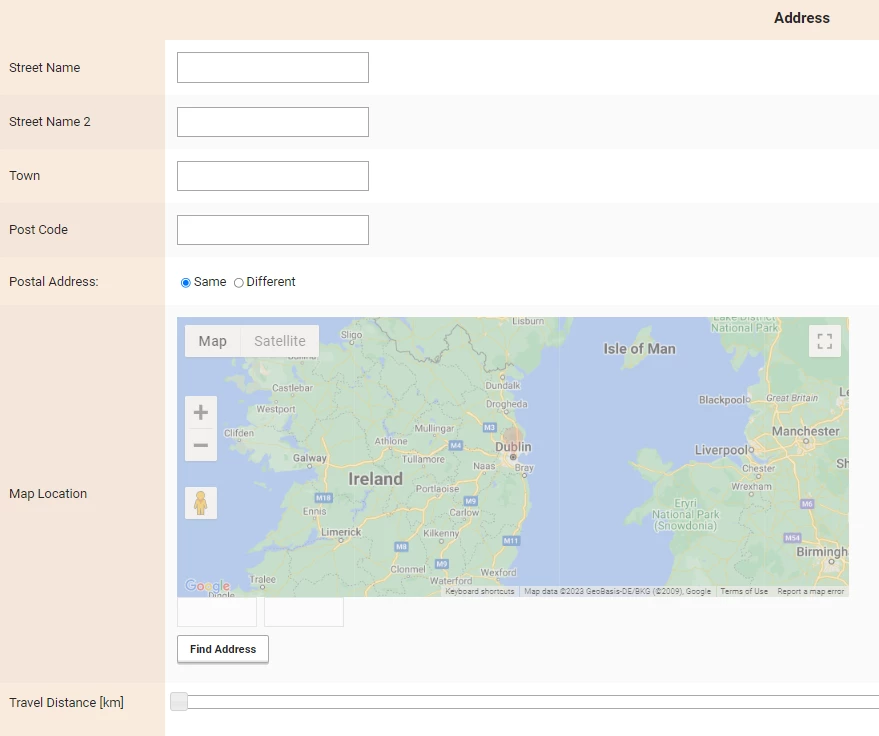
Travel Distance (Km) – You can also set the preferred work radius the employee is prepared to travel within.
Bank Details
Below the Address details, fields are provided for the employees BIC and IBAN bank account numbers for any remuneration.
Additional Details
Here the first field provides a dropdown menu for the Reference Status. Not Required is the default status. The Join Date field is automatically added and is the date when the employee has been added to the platform. The COVID Vaccination Expiry Date field provides a calendar on which their vaccination expiry date can be inserted. By pressing the green Next Year button grants vaccination status as a full year from the Join date.

Role and Experience
At the bottom of the page there is a grey bar for inserting the new employee’s role, Doctor, HCA, nursing bands or any other roles the agency manages. On the right there is another dropdown menu for the new employees experience in years. Make sure their experience is entered or you will be unable to add and save the new employee. The green Add Role Experience button allows you to add any further roles and experience for the employee.

In the submenu, you have links to other features related to this employee:
Employee availability – Ability to review the availability set for the employee.
Employee events summary – List of the shifts connected to the employee and where they were working.
Others > App logins – Will display if the user is active in any app and when the app was last connected
Others > History – List of the changes made to the employee profile.
Exports – This feature will allow you to export the employee profile information into the fully customised Word document. This needs to be enabled by the company administrator via the Company settings page (otherwise the default template export can be found in submenu Others).

Employee Status types
All employees in Temp Manager have a Status type that dictates employee permissions.
The following status types are currently available:
- Active – An employee who has been approved by a consultant can login to the website and has full access to the app.
- Registered – A newly registered employee who has not yet been approved by a consultant, can login to the website and has full access to the app.
- Interviewed – A registered employee who has been interviewed, can login to the website and has full access to the app.
- Inactive (Closed) – An employee that is not actively working anymore cannot login to the website or app. Additionally after a period of time, sensitive information about this employee is removed. You can learn more in our Privacy policy. When the employee has finished working for you, make sure you change their status to Inactive so they are no longer in the active list.
- Banned – Has no access to either the website or app, employee information is stored indefinitely.
- Parked – Employee that was temporarily put on hold, has no access to either the website or app.
Procedure for Unblocking an Employee
If an employee has been blocked on the platform after they have made too many login attempts, it is a very simple process to unblock them.
From the Main dashboard, select Employees:
From the employee list, hover over the individual you wish to unblock and select Edit employee ![]() from the popup icons that appear on the right of the employee row.
from the popup icons that appear on the right of the employee row.
This will bring you to the Employee Profile page where you should click on the blue Others button on the top right of the screen.
![]()
From the dropdown provided, select Unblock Employee. A lightbox appears detailing the number of login attempts, the IP address and if an attempt has been made to reset their password. When you click the green Unblock login button the employee is now unblocked and can either attempt to login again or reset their password if unsure of the correct login details.
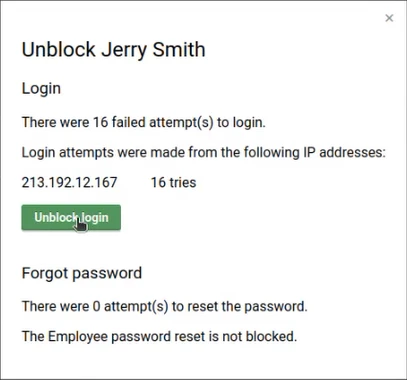
When you click the green Unblock login button the employee is now unblocked and can either attempt to login again or reset their password if unsure of the correct login details.